Table of Contents
- Before You Begin Migration
- Hardware & Software Check
- Conclusion
Before You Begin Migration
In May of 2018, Magento was reportedly acquired by Adobe for almost $1.7 billion.
Two years later in June 2020, the new owner called off Magento 1.x support for both Magento Commerce and Magento Open Source.
This means, all websites using Magento will need to be migrated to Magento 2.
What happens if you continue using the outdated version of Magento?
Simply put, any bugs or security issues you encounter, you will have to sort out by yourself. Even if you have a team of dedicated resources for this task, doing this can be troublesome and time consuming.
The most sensible course of action is thus migrating to Magento 2.
While doing this is a technically demanding task, in this article, I have tried to simplify it as much as possible.
Before we get into the actual migration, let’s look at a few things you should do before you begin:
Before You Begin Migration
- Backup all data, files, folders, and your entire database.
- Create a clone of your current Magento store and perform the migration with the clone. Don’t attempt migration on a live Magento store, especially if this is your first time doing something like this.
With the above safety nets in place, you are primed and ready to execute an M1 to M2 migration.
Hardware & Software Check
However, before we begin to talk about migration, let’s take another brief moment to look at the software and hardware requirements for running Magento 2 installation.
Magento 2 does not work with PHP 5. To run Magento 2, you should have the following installed on your server:
- PHP version 7.0.13+ or version 7.1.x
- MySQL 5.6/5.7 or MariaDB 10.0/10.1/10.2 or Percona 5.7
- PHP extensions: bc-math, ctype, curl, dom, gd, intl, mbstring, mcrypt, hash, openssl, PDO/MySQL, SimpleXML, soap, spl, libxml, xsl, zip, json, iconv
Those were the software requirements. Besides these, you will also need a minimum of 2 GB of RAM and 24 GB+ of SSD (Solid State Drive).
Once you have the necessary software and hardware in place, and have created the necessary backups, you can jump into the five-step process of migrating from Magento 1 to Magento 2.
Here’s each step in detail:
Step 1 : Stock Magento 2 Installation
The first step of this migration is to install Magento 2.
To do this, head over to the official website and download the latest version of Magento 2 Open Source.
Once downloaded, install Magento 2 on the 2 GB RAM and 24GB+ SSD server.
A combination of Nginx and PHP-FPM 7.1 is the ideal configuration for this task and Magento 2 comes with a preloaded configuration file that makes it compatible (nginx.conf.sample).
There are two ways to install the magento 2.
- a) Browser based
- b) Command Line based
- a) Browser based
Once you have everything in place, open your browser and begin the installation process.

Installation, as you can see in the image above, is a six-step process. Steps involved within each stage of the installation process will appear on your screen as you progress through the process.
In step 6, you will be prompted to click on the “install now” button and the installation will begin.
Once the installation is complete, move on to the next step.
b)
Command line based, If you have ssh access, you need to follow some commands in magento 2.
magento setup:install with some options
Like :
magento setup:install –base-url=http://127.0.0.1/magento2/ \
–db-host=localhost –db-name=magento –db-user=magento –db-password=magento \
–admin-firstname=Magento –admin-lastname=User –admin-email=user@example.com \
–admin-user=admin –admin-password=admin123 –language=en_US \
–currency=USD –timezone=America/Chicago –use-rewrites=1 \
–search-engine=elasticsearch7 –elasticsearch-host=es-host.example.com \
–elasticsearch-port=9200
If you have elastic search then using the search engine options otherwise you can leave this.
Step 2: Data Migration
In order to effectively perform a data migration, you will need to install a PHP package manager software called Composer. You will also need SSH (Secure Shell) access before you can start the migration process. You can obtain this access from your system administrator or your hosting support team.
Composer will in turn enable you to install Magento Migration Tool (MMT) created by the Magento team. This program will ease the process of data migration from M1 to M2.
To install MMT, visit repo.magento.com.
Once installed, the MMT will place the file in the M2 folder. Once that happens, run the following commands inside the folder:
composer config repositories.magento composer https://repo.magento.com
composer require magento/data-migration-tool:2.3.0
(the number at the end 2.3.0, is the version of our M2 platform version. If you have downloaded a different version, make sure you replace the values)
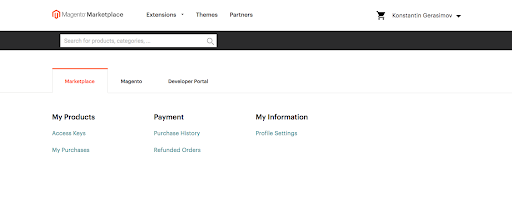
When you run the Composer, you will be asked for authentication keys. To obtain these, head over to the Magento website, log in to your account, and head over to the “my profile” section.
Here, under the Marketplace tab, you will find a link for Access Keys.

When you click through on Access Keys, you will be presented with a Public Key and a Private Key.
You can use the Public Key as the username and the Private Key as the password to install the MMT.
Now, it is time to configure the tool. To do this, open the Magento 2 root folder and find the following directory:
vendor/magento/data-migration-tool/etc/opensource-to-opensource/1.9.3.9
From here, copy the config.xml.dist file to config.xml and substitute the number at the end (1.9.3.9) with your current version of Magento 1. If you are migrating from the Community Edition of Magento to the Commerce addition, you will also be required to change opensource-to-opensource to opensource-to-commerce.
Once done, open config.xml and find the following code block:

Next, enter the database credentials for Magento 1 and Magento 2 and include password attributes in the following manner:

Inside the tag, you will be asked to specify a . It will look something like this:
……
689e13e5b98a2d82da67a7042b582f9e
…
You can find this key in the root folder of your M1, inside the app/etc/local.xml folder.
Step 3: Settings Migration
Before we can effectively execute the actual data migration, we must migrate the settings. To do this, go into the M2 root folder and run the following:
php bin/magento migrate:settings vendor/magento/data-migration-tool/etc/opensource-to-opensource/1.9.3.9/config.xml
If there are no errors, the migration will be completed in no time.
If you do have errors, try to change the settings in the XML configuration file. To do this, copy the following to settings.xml before editing:
vendor/magento/data-migration-tool/etc/opensource-to-opensource/1.9.3.9/config.xml:
etc/opensource-to-opensource/settings.xml.dist>
Make sure you have specified the right filename in config.xml.
etc/opensource-to-opensource/settings.xml
Next, you will be able to set up settings.xml any way you see fit.
Once done, we can move on to initial data migration.
Step 4: Initial Data Migration
The real data migration begins. In this step, we will be migrating data of orders, customers, along with your actual store data.
To begin, input the following command:
# php bin/magento migrate:data vendor/magento/data-migration-tool/etc/opensource-to-opensource/1.9.3.9/config.xml
If you get errors, don’t worry, here’s how you can fix them:
Error: Foreign Key Constraint Fails
This one is a simple issue to fix. Here’s how it will look:
[ERROR]: Foreign key (FK_CATALOG_EAV_ATTRIBUTE_ATTRIBUTE_ID_EAV_ATTRIBUTE_ATTRIBUTE_ID) constraint fails on source database. Orphan records id: 121,164 from `catalog_eav_attribute`.`attribute_id` has no referenced records in `eav_attribute`
To fix this, all we have to do is delete orphaned records from the specified tables. This command will do the job:
DELETE FROM catalog_eav_attribute WHERE attribute_id IN (121, 164);
Error: Field Is Not Mapped
[INFO][mode: data][stage: integrity check][step: EAV Step]: started
100% [============================] Remaining Time: < 1 sec
[ERROR]: Source fields are not mapped. Document: customer_eav_attribute. Fields: is_used_for_customer_segment
To fix this, simply exclude the source fields in question from the map-emv.xml file:
etc/opensource-to-opensource/1.9.3.9/map.xml.dist etc/opensource-to-opensource/map-eav.xml.dist
As you can see, it is under the EAV step, so the correct file in this case is map-eav.xml.dist.
Next, open the map-eav XML file and add the following inside the tags:
customer_eav_attribute.is_used_for_customer_segment
…..
Once you have modified the XML file, make sure you add a “-r” (reset switch) to the migrate:data command.
Error: Source Documents Not Mapped
[INFO][mode: data][stage: integrity check][step: Map Step]: started
100% [============================] Remaining Time: < 1 sec
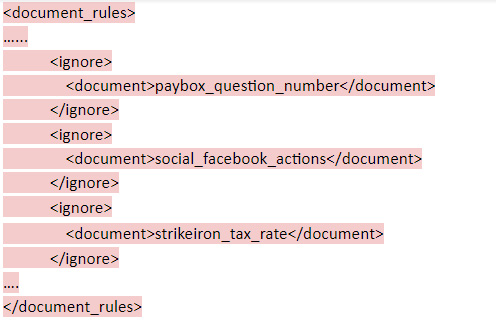
[2018-09-18 19:21:55][ERROR]: Source documents are not mapped: paybox_question_number,social_facebook_actions,strikeiron_tax_rate
This problem can be solved by adding ignore statements to the XML map file.
The file would look something like:
etc/opensource-to-opensource/1.9.3.9/map.xml.dist
In this, place ignore statements like the following:

Once you have solved all these issues, you should be able to migrate all the data:
php bin/magento migrate:data -r -a vendor/magento/data-migration-tool/etc/opensource-to-opensource/1.9.3.9/config.xml
[2018-09-19 17:48:50][INFO][mode: data][stage: integrity check][step: Data Integrity Step]: started
…..
…..
…..
[2018-09-19 17:49:11][INFO][mode: data][stage: volume check][step: Tier Price Step]: started
100% [============================] Remaining Time: < 1 sec
[2018-09-19 17:49:11][INFO][mode: data][stage: data migration][step: SalesIncrement Step]: started
100% [============================] Remaining Time: < 1 sec
[2018-09-19 17:49:11][INFO][mode: data][stage: volume check][step: SalesIncrement Step]: started
100% [============================] Remaining Time: < 1 sec
[2018-09-19 17:49:11][INFO][mode: data][stage: data migration][step: PostProcessing Step]: started
100% [============================] Remaining Time: < 1 sec
[2018-09-19 17:49:11][INFO][mode: data][stage: data migration][step: PostProcessing Step]:
Step 5: Migration completed
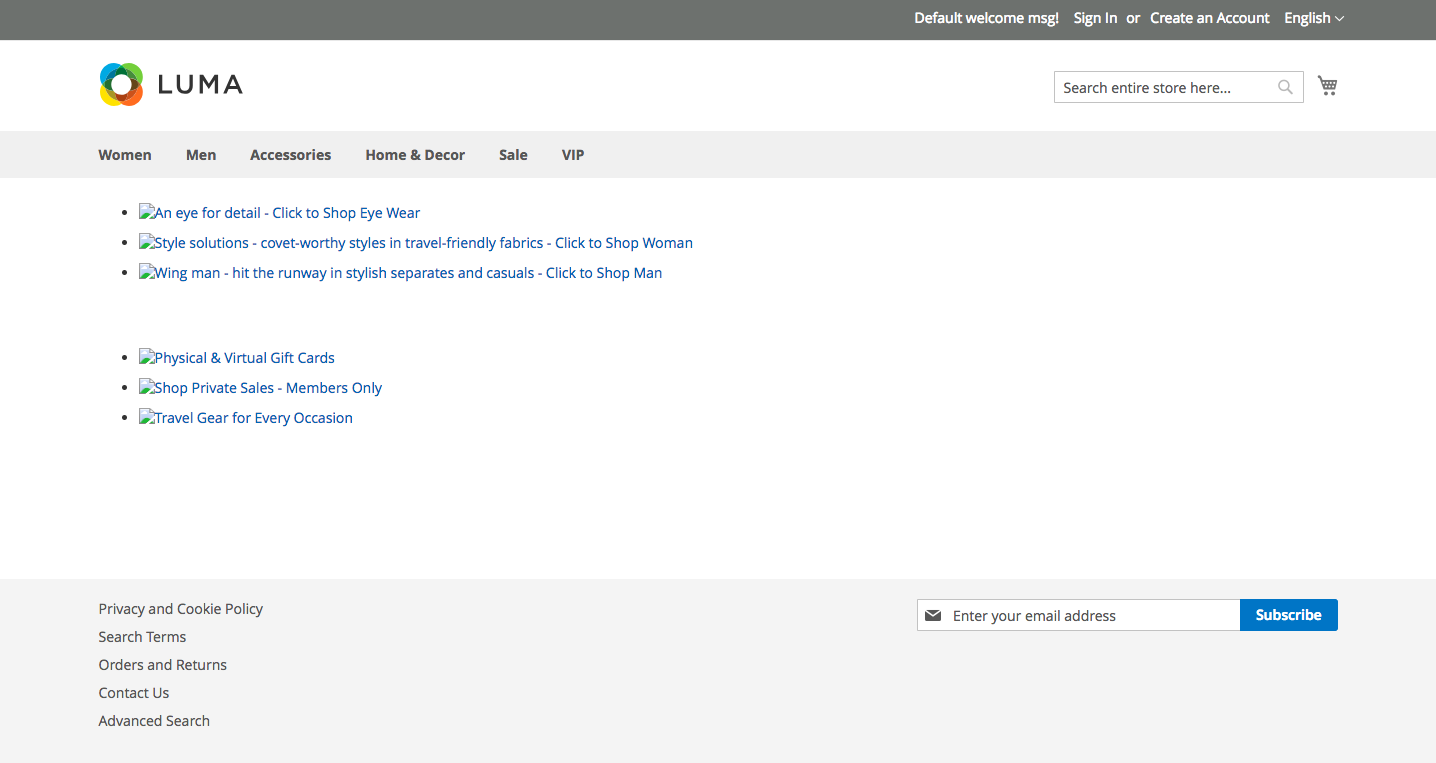
Now, try to open your newly migrated M2 website. It should look something like this:

You may have noticed that categories and images are missing. Let’s add everything that is left in the next steps.
Step 6: Migrating Media Files
While most aspects of your site will be automatically transferred, media files will have to be taken care of manually.
However, if you were storing your files in a database with Magento 1, the transfer will be automatic. To make sure it happens, make sure to complete the sync before you perform data migration. To do this, execute these steps:
- Go to Magento 1 backend menu > System > Configuration > Advanced > System
- Click the Synchronize button.
However, if you have stored your images in a media file, you will have to migrate them manually.
Doing this is very easy. Simply copy the M1:media folder over to M2:pub/media:
cp -r /path/to/magento1/media /path/to/magento2/pub
Next, reindex the Magento 2 store with the following:
php bin/magento indexer:reindex
Then run the following to compile it:
php bin/magento deploy:mode:set production
Voila! Your website should now be populated with all the products and corresponding images.
Step 7: Migrating Themes And Extensions
M1 themes and extensions are mostly not compatible with M2. The migration can mean diving deep into the technicalities of M1 and M2.
For this reason, it is better to hire a skilled Magento develop to take care of theme and extension migrations.
Step 8: Test The New Magento Store
After you have completed the migration, you might be excited to take your brand new Magento 2 store live. However, before you can do that, I strongly recommend taking it for a test drive. To do this, follow these steps:
List out all the features of your original M1 store and check if they are working in your new M2 store.
Test every available payment method.
Test shipping setups.
Conclusion
Out of all the complex technical steps mentioned in this article, the most important one is the simplest one, the testing.
Testing is important to ensure your store continues to provide your customers with delightful experiences.
That’s why, my recommendation is to not limit the testing to the features and functions I have mentioned. Instead, take it a step further and test EVERYTHING that you possibly can.
CTA: Get help migrating to Magneto 2 Now!
FAQs
How Is Magento 2 Better Than Magento?
Magento 2 is better than Magento 1 in various aspects. The latest version has better performance and speed. It has been built with a focus on performance optimization. It also offers its users a responsive admin panel and a friendly interface. Additionally, the version has been enhanced for mobile responsiveness. Further, Magento 2 introduced a streamlined and simplified checkout process compared to Magento 1. Overall, Magento 2’s responsiveness, performance, friendly interface, and flexibility have made it a preferred choice for e-commerce projects.
What Is Magento 2 Migration?
Magento 2 migration refers to the process of transitioning an e-commerce store from the original Magento 1 platform to the newer Magento 2 platform. This transition will help you use the latest, more flexible, user-friendly, and responsive version.
To migrate to the latest version, you need to:
- Plan properly,
- Backup the data of Magento 1
- Install and set up Magento 2,
- Migrate the existing data to the new platform,
- Make the required changes and check all configurations,
- Launch your Magento 2 store.
How Do I Migrate To Magento 2?
Migrating from Magento 1 to Magento 2 consists of serval steps:
- Proper planning: Transitioning requires migrating all the data from Magento 1 to the latest version.
- Set up your Magento 2 store: Install the new Magento 2 on the staging server.
- Configure the data migration tool:Magento provides the official Data Migration Tool to assist with this process. It helps transfer various information.
- Make changes (if required) to the migrated data: After configuration and data migration, check for any other changes you need to make.
- Launch: The latest version is ready to be launched!
Why Should You Migrate To Magento 2?
Migrating from Magento 1 to Magento 2 offers many compelling benefits. With improved performance, user experience, and security, Magento 2 provides features that you can’t ignore. Additionally, faster page load times and scalability, enhancing customer satisfaction and conversions, are some of the features that are present in the latest version. Also, its admin panel responsiveness makes it very customer-friendly. Further, Magento 2 is better for SEO strategies. This version supports meta tags, which makes it SEO-friendly. Overall, transitioning to Magento 2 is imperative for enhanced performance, customer satisfaction, and growth.


